How to butcher chickens: a documentary in photographs
Warning: this is a graphic ‘how to’ photo essay on chicken dispatching and butchering, do not read any further unless you are really interested in learning the art of home butchery. Note these directions will work for turkey, chicken and ducks (and their wild cousins). See butchering turkey post for specifics on turkeys.
I was all set to butcher my Cornish Crosses this morning but they are still too skinny! So, instead I decided to butcher some of my larger roosters from last year. Although they are getting along fine with each other, I really do have too many of them. I am going to give one of my favourites away to the friend who lost all her chickens to the marauding bears in January. She has finally gotten herself another flock of gals who are in need of a beau. So, its the Pavarotti understudy who is the model for the accompanying photos. He was big and gorgeous but not new blood, so he has to go.
1. Step One: Preparing the work area.
Clean your work station so it is ready for the job.

Clean workstation ready for the task.
Mine is about as simple an operation as anyone would want. Here is the list of equipment I work with:
a) An easy to clean table for the gutting and cleaning process (mine is a piece of smooth arbourite that sits on top of my table).
b) Block of wood for knocking the bird unconscious and killing cones to place the bird in to bleed out.
c) Knives sharp enough to do the job easily. I keep an assortment of sizes for different aspects of the job.
d) Plucking machine (not necessary, but helpful on the hands!)
e) Scalder and heat source: in my case is an old beer keg with an end cut off so I can fill it with water which sits on a metal stand so I can get a flame underneath it for heating the water. This is my newly acquired elaborate piece of equipment that is actually borrowed from someone who no longer uses it. Alternatively, place a metal container over an open fire will also work (see Poultry in Motion or Butchering Turkeys for examples).
f) Clean plastic or metal containers for rinsing the ‘keepables’ (heart, liver, gizzard, and neck) and cooling the birds after processing.
g) Various buckets for hand washing, collecting the guts and blood, towels for drying hands, cloths for wiping up, dish soap, running water.
2. Step Two: render the bird unconscious
Grab the bird by the feet then swing the bird over your head and swifty, and with force, bring its head down onto a hard surface so as to knock him unconscious. This is the first time I’m doing it this way since speaking with another farmer about how he kills his birds. He convinced me that it was worth trying. The idea is that you render it unconscious before slitting its jugular and therefore it is a more humane way of killing the bird than simply slitting it while fully conscious. Until today, I have always just slit them once in the killing cones. I must say, this method is preferable and there is a definite ease in dealing with them in the killing cones. When they are not unconscious, they can kick and fuss and even jump their way out of the cones after they are cut. This does not happen when the bird is unconscious. It made for a much more relaxed dispatch process in general.

Rendering the bird unconscious by hitting his head on the wooden board.
A life defining moment:
I once saw Australian Aboriginal women do this with monitor lizards in the Outback. She drug it from its hole (after tracking it) by the tail and swung it overhead–exactly as I’m doing in the above photo–and brought its head down over a rock. It was shocking at first to see and yet my immediate thought was, ‘That is the kind of woman you need around if you’re ever in a pinch!” I was so impressed with those ladies that I thought, “I have to become one of those kind of women”. It’s taken a few years–not to mention a few tears–but I’m nearly there!
3. Step Three: killing the bird
Place the bird in the killing cone. Then, bring its head through the hole at the bottom. Have your knife ready (it will need to be very shard for chickens, especially roosters because they are heavily feathered in the neck region where you will need to cut). To locate the jugular vein, look at the chicken’s cheek. You will see it’s ear tuft of hair and jowl. The jugular is located at the edge of the cheek/jawline in line with its ear. Imagine the corner of your jaw and then look at the chickens jaw for the same point. Cut there. You will know that you have cut correctly when the blood spurts out of the neck. If it is slowly dribbling, you have not yet found the jugular–keep cutting. Repeat on both sides.

Grab the head and locate the jugular area before beginning your cut.
4. Step four: Scalding
Put the bird in the scalder for several seconds and swish it in an up and down motion to allow the water to penetrate through the layers of feathers. The scalder water temperature should be at least 145 degrees F. Opinion varies widely on how hot the water should be. I make sure it is above 145F and no hotter than 170F. If it fluctuates between those temperatures, I don’t tend to worry about it. Simply take the heat source away from the water if it gets too hot. If you cover the scalder with a lid between birds the water will hold its temperature surprisingly well.

Chicken after several seconds of dunking in water scalder.
5. Step Five: Plucking the feathers.
Place the bird on the plucking machine. Gently roll it over from side to side so that all the body parts are eventually exposed to the plucker. Alternatively, place it on the table and start plucking by hand! Not all the feathers will come easily, some will have to be hand plucked even with the plucking machine.

The plucking machine saves my hands from a lot of tedious work!

Finishing touches of feather removal must be done by hand.
6. Step Six: Remove lower legs.
Once you have the feathers off it is time to start the butchering process. Grab hold of the lower leg and bend it backward slightly. Take the knife and begin your cut at the joint. Cut through the cartilage and avoid cutting the bone. This makes the leg removal cleaner and easier.
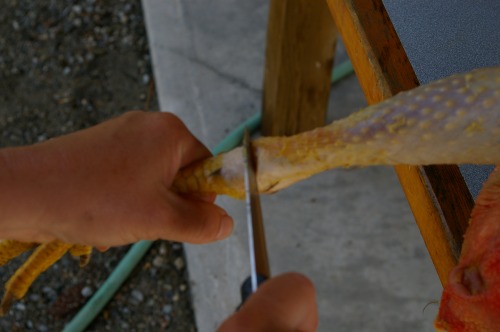
Removing the lower leg.
7. Step Seven: Cut off the head.
Place your hand on the head, tilt the head back and sever between the head and neck. Once you have the meat cut all the way around the base of the head, you should be able to pull the head off. This is better than cutting through the bones in the neck as it leaved the chicken certainly clean of bone shards. Then, cut into the neck skin just below the top of the breast bone. Be careful not to cut into the flesh inside or the crop which is located in this throaty area.
8. Step Eight: Remove the crop.
Cut the skin all the way around the neck so it will be removable. You don’t have to cut as high up towards the breast as I have in order to get at the crop. If you want to retain more of the skin around the breast, then cut up from the neck towards the breast (instead of from the breast down as I have in the photo) just enough to get your hand into the chest cavity. Pull the crop away from the chest cavity and locate its outlet that goes deep into the body. Then locate the esophagus which lays alongside the crop outlet. Cut both these tubes and remove them from their location. Gently pull the crop and the tubes out of the body and pull the neck skin along with it to remove it from the chicken entirely.

Carefully cutting into chest cavity.
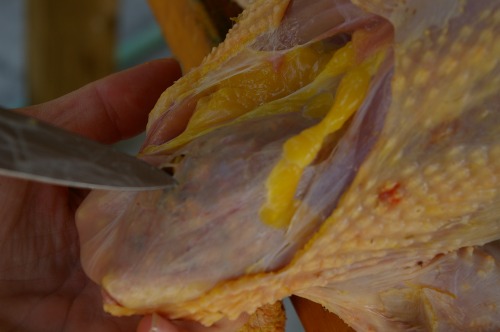
Locate the crop being careful not to cut it open.

Carefully cut the crop away from the body cavity.
Note: I’ve taken too much of the skin around the breast away to make the perfect roasting bird. Luckily, this fellow is going to be made into Chicken Byriani by my friend from Hyderabad, India on Friday night so it is not a problem.

Pull the crop along with the neck skin down over the neck and off the bird.
9. Step Nine: Gut removal
Cut into the stomach cavity below the breast bone and down towards the anus, being careful not to cut into the meat or the guts inside. Cut down and around the anus. Gently pull the anus and colon away from the bird. Then place your hand inside the bird and pull the organs away from the cavity wall. Turn your hand from side to side to help dislodge the connective tissue. Grab hold of all that you can, including the lungs which are at the back of the bird, and pull it all out of the hole you’ve made. You can either toss all the guts away at this point (a bit of a waste of good nutritional value in the form of lost giblets), or clean the heart, liver and gizzard for use in the gravy and stuffing.

Carefully cut into stomach cavity of bird at base of breast bone.

Cut towards the anus being careful not to cut through colon.

Here is the colon on the inside of the bird still attached to the now removed anus.

Gently pull the anus and colon out and away from the body of the bird.
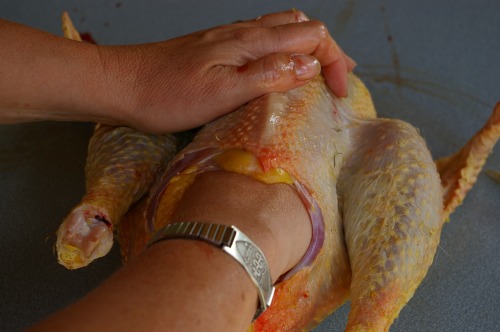
Place your hand inside stomach cavity and dislodge all the innards from the chest wall.
10. Step Ten: Prepare the giblets.
Cut the heart in half and wash in clean water. Cut the gal bladder from the liver and wash the liver. Cut open the gizzard and remove its contents then clean and wash it. Place the above in cool water.

The innards of the chicken: heart, lungs, liver, kidneys, gizzard, and intestines.
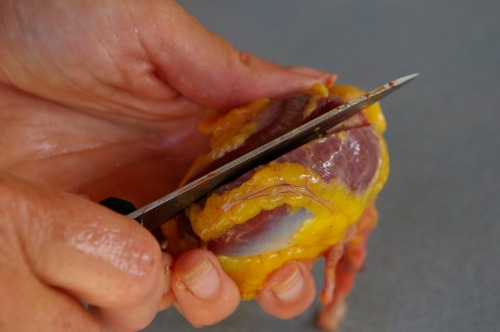
Cut open the gizzard being careful not to cut through the inner sac.
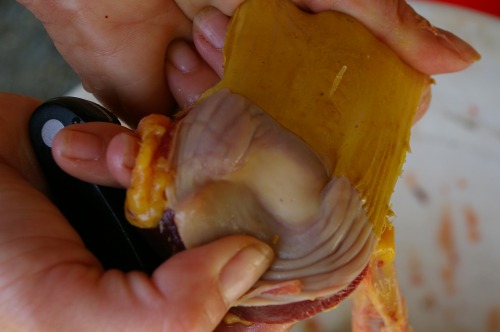
Pull the inner sac away from the gizzard.

The giblets cleaned and ready for packaging: neck, heart, liver, and gizzard.
11. Step Eleven: Remove oil sac:
At the base of the back just above the tail feathers is the oil sac. Place your knife above the sac and cut fairly deep into the skin. You want to go in and behind the two sacs and come out above the tail feathers but below the sac. In the photo below, you can see clearly a nub where a feather used to be. This is the base of the oil sac and where you want your cut to come out below.

Remove the oil sac at the base of the back above the tail.
12. Step Twelve: Prepare for storage
I always wrap the giblets in celophane and place them along with the neck into the body cavity as you would a turkey. This way the are available for use in gravies, curries, or stuffing. They add nutritional value to our lives that we are no longer getting in the form of organ meats thanks to our contemporary lifestyle of store-bought meat. Then I place the birds in zip-lock freezer bags and freeze if I’m not planning on using them right away.

The giblets are wraped in celophane and placed inside the bird along with the neck.

The chicken weighs in at precisely 5 pounds.

